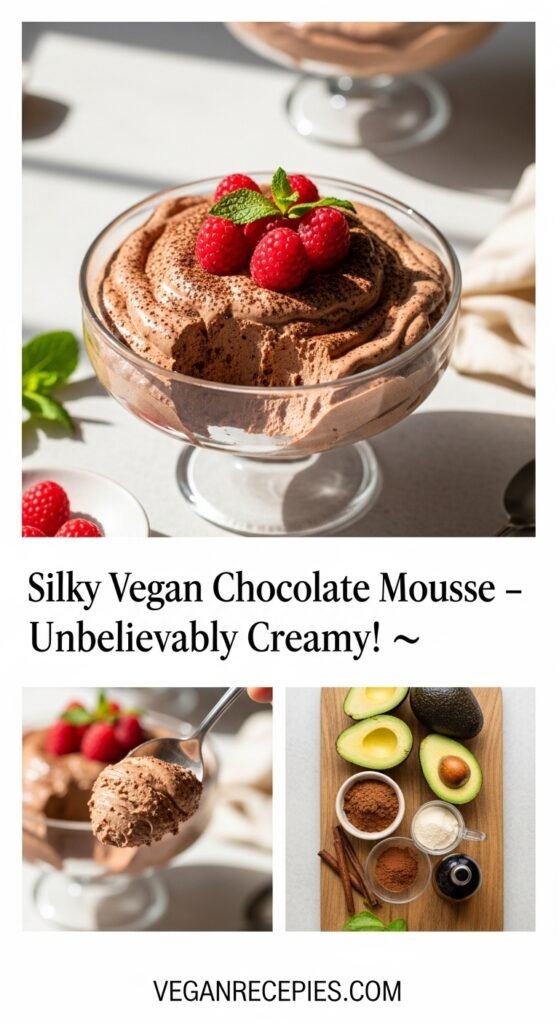
Silky Vegan Chocolate Mousse: The Dreamiest Dairy-Free Dessert
Introduction
Prepare to discover the most incredibly silky vegan chocolate mousse that will completely transform your understanding of plant-based desserts. This luxuriously creamy, intensely chocolatey masterpiece proves beyond any doubt that dairy-free desserts can be just as indulgent, satisfying, and absolutely swoon-worthy as their traditional counterparts. With its cloud-like texture, deep chocolate flavor, and impossibly smooth finish, this easy vegan chocolate mousse delivers pure chocolate bliss in every single spoonful—and no one will ever guess it’s completely plant-based.
What makes this dairy-free chocolate mousse truly exceptional is its remarkable simplicity paired with sophisticated results. Using just a handful of wholesome ingredients that you likely already have in your kitchen, you can create a dessert that looks and tastes like it came from an upscale French patisserie. The secret lies in the magical combination of rich dark chocolate and creamy coconut milk, which whip together into an airy, velvety mousse that melts on your tongue and leaves you craving just one more bite.
This healthy chocolate mousse recipe is perfect for so many occasions throughout the year. Serve it as an elegant finale to a dinner party where you want to impress guests without spending hours in the kitchen. Prepare individual portions for a romantic Valentine’s Day dessert that’s both indulgent and thoughtful. Make a big batch for holiday gatherings where guests with dietary restrictions deserve something truly special. Enjoy a small cup as an everyday treat when you need a chocolate fix that won’t leave you feeling weighed down. Once you master this effortless technique, you’ll have a go-to dessert recipe that never fails to delight.
History & Background
Chocolate mousse holds a prestigious place in the pantheon of classic French desserts, with a history that stretches back to the 18th century when French cuisine was establishing itself as the gold standard of culinary excellence. The word “mousse” comes from the French word meaning “foam” or “froth,” perfectly describing the airy, cloud-like texture that defines this beloved dessert. Traditional French chocolate mousse relied on whipped egg whites and heavy cream to achieve its signature lightness, creating a dessert that was considered the height of sophistication.
The classic technique for making chocolate mousse was developed and refined in the kitchens of French aristocracy, where skilled pastry chefs competed to create the most impressive, delicate desserts for elaborate banquets and royal courts. The dish gained widespread popularity during the 19th and 20th centuries as French culinary techniques spread throughout Europe and eventually to America, where chocolate mousse became a staple of fine dining restaurants and special occasion menus.
The evolution of vegan chocolate mousse represents a fascinating chapter in this dessert’s history. As plant-based eating gained momentum in the late 20th and early 21st centuries, creative cooks began experimenting with ways to replicate the beloved mousse texture without eggs or dairy. The breakthrough came with the discovery that aquafaba (chickpea liquid) could mimic whipped egg whites, and that full-fat coconut cream could replace heavy dairy cream with remarkable success. Some versions use silken tofu or avocado for creaminess, while others rely purely on the magic of coconut and chocolate.
Today’s vegan chocolate mousse honors the French tradition of elegance and technique while making this classic dessert accessible to those following plant-based diets, managing dairy allergies, or simply seeking lighter alternatives. The result is a dessert that maintains all the sophistication and indulgence of the original while aligning with modern dietary preferences and values. This recipe represents the best of both worlds: timeless French elegance meets contemporary plant-based innovation.
Why You’ll Love This Recipe
This silky vegan chocolate mousse delivers everything you want in a dessert—intense chocolate satisfaction, luxurious texture, and impressive presentation—while being remarkably simple to prepare.
The combination of rich dark chocolate and creamy coconut creates a mousse that’s simultaneously light and indulgent, satisfying your chocolate cravings without the heaviness of traditional dairy-based desserts. Every spoonful delivers pure chocolate bliss.
Here’s why this creamy plant-based dessert will become your new favorite:
- Unbelievably silky texture – Smooth, airy, and melt-in-your-mouth luxurious
- Intensely chocolatey – Deep, rich chocolate flavor that true chocolate lovers crave
- Simple ingredients – Made with just 4-5 pantry staples you likely already have
- No baking required – A completely no-bake dessert that’s perfect for hot days
- Naturally dairy-free – Perfect for vegans, lactose-intolerant guests, and dairy-free diets
- Impressive presentation – Looks like a professional dessert despite being effortless
- Make-ahead friendly – Prepare hours or even a day in advance for stress-free entertaining
- Customizable flavors – Easily adapted with different flavor additions and toppings
- Healthier indulgence – Contains beneficial antioxidants from dark chocolate
- Quick preparation – Active prep time is just 15 minutes before chilling
Ingredient Notes
Understanding each ingredient’s role helps you create the most luxurious, perfectly textured vegan chocolate mousse possible. Quality matters enormously with such a simple recipe.
Dark Chocolate: This is the star ingredient and the quality you choose directly impacts your final result. Use high-quality dark chocolate with at least 60-70% cacao content for the best flavor and texture. Avoid chocolate chips, which contain stabilizers that prevent proper melting. Look for chocolate bars or baking chocolate from reputable brands. The chocolate should taste delicious on its own—if you wouldn’t enjoy eating it plain, it won’t make great mousse.
Full-Fat Coconut Milk: The thick, creamy portion of canned coconut milk provides the luxurious texture and richness that replaces dairy cream. Use full-fat coconut milk, not light coconut milk or coconut beverage. Refrigerate the can overnight so the cream solidifies and separates from the water. You’ll use primarily the thick cream for the richest results. Brands with higher fat content produce better mousse.
Maple Syrup or Agave Nectar: A small amount of natural sweetener balances the bitterness of dark chocolate and enhances overall flavor. Pure maple syrup adds subtle caramel notes, while agave provides neutral sweetness. Start with less sweetener and adjust to taste—the amount needed depends on your chocolate’s sweetness level.
Vanilla Extract: Pure vanilla extract adds aromatic depth and rounds out the chocolate flavor, preventing it from tasting flat or one-dimensional. Use real vanilla extract, not imitation, for the best flavor. A small amount makes a noticeable difference.
Sea Salt: A tiny pinch of fine sea salt intensifies chocolate flavor and adds complexity. Salt is the secret ingredient that transforms good chocolate mousse into extraordinary chocolate mousse. Don’t skip it—you won’t taste saltiness, just enhanced chocolate depth.
Aquafaba (Optional): The liquid from canned chickpeas whips into stiff peaks like egg whites, adding extra airiness to the mousse. This ingredient is optional but creates an even lighter, more traditional mousse texture for those who want it.
Equipment Needed
This vegan chocolate mousse requires minimal equipment, most of which you likely already own.
- Medium saucepan or double boiler (for melting chocolate)
- Heat-safe mixing bowl
- Whisk or electric hand mixer
- Rubber spatula
- Measuring cups and spoons
- Can opener
- Serving glasses, ramekins, or small bowls (4-6 portions)
- Refrigerator (for chilling)
- Optional: stand mixer with whisk attachment
- Optional: piping bag with decorative tip (for fancy presentation)
- Optional: fine-mesh strainer (for silky-smooth texture)
📋 Recipe Card
Prep Time: 15 minutes
Cook Time: 5 minutes (for melting chocolate)
Chilling Time: 2-4 hours (or overnight)
Total Time: 2 hours 20 minutes
Yield: 6 servings
Category: Dessert
Method: No-Bake, Stovetop
Cuisine: French, Plant-Based
Diet: Vegan, Dairy-Free, Gluten-Free
Description: This incredibly silky vegan chocolate mousse features rich dark chocolate and creamy coconut milk whipped into a cloud-like, melt-in-your-mouth dessert. With just a few simple ingredients and no baking required, you can create an impressive, restaurant-quality mousse that’s perfect for any occasion.
Ingredients
For the Chocolate Mousse:
- 8 ounces (225g) high-quality dark chocolate (60-70% cacao), finely chopped
- 1 can (13.5 oz) full-fat coconut milk, refrigerated overnight
- 3 tablespoons pure maple syrup (adjust to taste)
- 1 teaspoon pure vanilla extract
- ⅛ teaspoon fine sea salt
Optional for Extra Airiness:
- ½ cup aquafaba (liquid from canned chickpeas), chilled
- 2 tablespoons powdered sugar
For Topping and Garnish:
- Coconut whipped cream
- Dark chocolate shavings or curls
- Fresh raspberries or strawberries
- Fresh mint leaves
- Cacao nibs
- Flaky sea salt
Instructions
Step 1: Prepare Your Coconut Cream
Remove the can of coconut milk from the refrigerator without shaking it. Open the can and carefully scoop out the thick, solidified coconut cream from the top, leaving the watery liquid behind (reserve it for smoothies). You should have approximately ¾ to 1 cup of thick coconut cream. Place the cream in a medium mixing bowl and set aside at room temperature to soften slightly while you prepare the chocolate.
Step 2: Melt the Chocolate
Finely chop the dark chocolate into small, uniform pieces for even melting. Create a double boiler by placing a heat-safe bowl over a saucepan with 1-2 inches of simmering water (the bowl shouldn’t touch the water). Add the chopped chocolate to the bowl and stir gently and frequently until completely melted and smooth, about 3-5 minutes. Alternatively, melt chocolate in the microwave in 30-second intervals, stirring between each, until smooth. Once melted, remove from heat and let cool for 5 minutes—the chocolate should be warm but not hot.
Step 3: Combine Chocolate and Coconut Cream
Add the maple syrup, vanilla extract, and sea salt to the softened coconut cream. Whisk until smooth. Slowly pour the slightly cooled melted chocolate into the coconut cream mixture, whisking continuously as you pour. Continue whisking until the mixture is completely smooth, glossy, and well combined. The mixture should be thick but pourable. If it seems too thick, add 1-2 tablespoons of the reserved coconut water.
Step 4: Whip for Airiness (Standard Method)
Using an electric hand mixer or stand mixer with whisk attachment, beat the chocolate-coconut mixture on medium-high speed for 2-3 minutes until it becomes slightly lighter in color and fluffier in texture. This incorporates air and creates a lighter mousse. Don’t over-whip—stop when the mixture holds soft peaks and looks airy.
Step 5: Optional Aquafaba Method (For Extra Lightness)
For an even lighter, more traditional mousse texture, whip the chilled aquafaba in a separate clean bowl with an electric mixer on high speed for 5-8 minutes until stiff peaks form (like meringue). Add powdered sugar and whip another minute. Gently fold the whipped aquafaba into the chocolate mixture in three additions, using a spatula and folding carefully to maintain airiness.
Step 6: Portion into Serving Dishes
Divide the mousse evenly among 6 serving glasses, ramekins, or small bowls. Use a spoon or spatula to create a smooth top, or leave it rustic with natural swirls. For an elegant presentation, transfer the mousse to a piping bag and pipe decoratively into glasses.
Step 7: Chill Until Set
Cover the mousse portions with plastic wrap (not touching the surface) or individual lids. Refrigerate for at least 2-4 hours, or preferably overnight, until the mousse is completely set and firm. The mousse will become more structured as it chills.
Step 8: Add Toppings and Serve
Just before serving, add your desired toppings. Top with a dollop of coconut whipped cream, chocolate shavings, fresh berries, mint leaves, cacao nibs, or a sprinkle of flaky sea salt. Serve chilled and enjoy immediately.
Notes
- The quality of chocolate dramatically affects the final result—use the best you can afford.
- Don’t skip the overnight coconut milk chilling step; it’s essential for proper cream separation.
- The mousse will firm up significantly in the refrigerator, so don’t worry if it seems soft initially.
- For the smoothest texture, ensure chocolate has cooled adequately before combining with coconut cream—hot chocolate can cause separation.
- Taste and adjust sweetness after mixing; different chocolates have varying sweetness levels.
- The mousse tastes best after chilling overnight when flavors have fully developed.
Nutrition Facts Table
Per serving (approximately ½ cup, based on 6 servings, without toppings)
| Nutrient | Amount |
|---|---|
| Serving Size | ½ cup (approximately 100g) |
| Calories | 285 kcal |
| Total Fat | 22g |
| Saturated Fat | 16g |
| Unsaturated Fat | 5g |
| Trans Fat | 0g |
| Cholesterol | 0mg |
| Sodium | 45mg |
| Total Carbohydrates | 24g |
| Dietary Fiber | 3g |
| Total Sugars | 18g |
| Protein | 3g |
Note: Nutrition information is calculated using standard recipe databases. Values may vary based on specific chocolate and coconut milk brands used. Dark chocolate provides beneficial antioxidants and minerals including iron, magnesium, and copper.
Tips & Variations
This versatile vegan chocolate mousse serves as a perfect canvas for creative flavor variations. Here are delicious ways to customize your mousse.
Mocha Espresso Mousse: Add 1-2 teaspoons of instant espresso powder or 2 tablespoons of strongly brewed coffee to the melted chocolate. The coffee intensifies chocolate flavor and adds sophisticated depth without making the mousse taste like coffee.
Orange Chocolate Mousse: Add 1 teaspoon of orange zest and ½ teaspoon of orange extract to the mixture. The citrus brightens the chocolate and creates a classic flavor combination reminiscent of fine European chocolates.
Mint Chocolate Mousse: Add ¼ to ½ teaspoon of pure peppermint extract (start with less—mint is potent). Top with crushed vegan mint cookies or fresh mint leaves for a refreshing variation.
Spiced Mexican Chocolate: Add ¼ teaspoon ground cinnamon, a pinch of cayenne pepper, and a tiny pinch of ground chipotle for a warming, subtly spicy mousse inspired by traditional Mexican hot chocolate.
Salted Caramel Chocolate: Drizzle vegan caramel sauce between layers of mousse and top with extra flaky sea salt. The sweet-salty combination is absolutely irresistible.
Peanut Butter Chocolate: Swirl 2-3 tablespoons of creamy natural peanut butter into the finished mousse before chilling, or layer peanut butter between chocolate mousse layers.
White Chocolate Variation: Use high-quality vegan white chocolate instead of dark chocolate for a completely different, vanilla-forward mousse. Adjust sweetener as white chocolate is sweeter.
Raspberry Chocolate Mousse: Layer fresh raspberries or raspberry sauce between portions of chocolate mousse for a classic, elegant combination.
Pro Chef Tips
Elevate your vegan chocolate mousse from good to extraordinary with these professional techniques that make all the difference.
Temper your chocolate properly. The temperature at which you combine the melted chocolate with coconut cream matters significantly. If chocolate is too hot, it can cause the mixture to separate or become grainy. Let melted chocolate cool for 5-7 minutes until it’s warm but comfortable to touch before mixing.
Use room-temperature coconut cream. Coconut cream that’s too cold won’t combine smoothly with chocolate and can cause seizing. Let it soften at room temperature for 10-15 minutes before using, but don’t let it become completely liquid.
Chop chocolate finely and uniformly. Small, uniform pieces melt more evenly and quickly, reducing the risk of overheating. This small step prevents grainy texture from unevenly melted chocolate.
Fold, don’t stir, when adding aquafaba. If using whipped aquafaba, fold it in gently using a large spatula with slow, deliberate motions from the bottom up. Stirring deflates the air you’ve worked to incorporate.
Strain for silk-smooth texture. For the most luxurious, professional-quality mousse, pass the mixture through a fine-mesh strainer before portioning. This removes any small chocolate pieces or coconut cream lumps.
Taste and adjust before chilling. Once chilled, adjusting sweetness or flavor becomes difficult. Taste your mousse mixture and make any adjustments before portioning into serving dishes.
Chill serving glasses beforehand. Placing serving glasses in the refrigerator before filling helps the mousse set faster around the edges and creates a more elegant presentation.
Common Mistakes to Avoid
Even this simple recipe can go wrong without proper attention. Here’s how to ensure your vegan chocolate mousse turns out perfectly every time.
Using chocolate chips instead of bar chocolate: Chocolate chips contain stabilizers that prevent proper melting and can result in a grainy, less-smooth mousse. Always use chopped chocolate bars or baking chocolate for the best texture.
Not chilling coconut milk overnight: If the coconut milk hasn’t been refrigerated long enough, the cream won’t separate properly from the water, resulting in a thin, watery mousse that won’t set correctly. Refrigerate for at least 12-24 hours.
Combining hot chocolate with cold cream: Temperature shock causes the mixture to seize and become grainy or separated. Let melted chocolate cool adequately before combining, and let coconut cream soften slightly at room temperature.
Under-chilling the mousse: Impatience is the enemy of perfect mousse. Chilling for less than 2 hours results in mousse that’s too soft and doesn’t hold its shape. For best results, chill overnight.
Over-whipping the mixture: While some whipping incorporates air, over-whipping can cause the mixture to become too thick, grainy, or begin to separate. Stop when the mixture looks fluffy and holds soft peaks.
Skipping the salt: That tiny pinch of salt seems insignificant but dramatically enhances chocolate flavor. Without it, the mousse can taste flat despite having quality chocolate.
Storage & Meal Prep
Vegan chocolate mousse is excellent for meal prep and entertaining because it actually benefits from advance preparation.
Refrigerator Storage: Store covered mousse in the refrigerator for up to 5 days. The texture and flavor actually improve after 24 hours of chilling as the flavors meld and deepen. Cover tightly with plastic wrap or lids to prevent absorption of refrigerator odors.
Serving Temperature: Mousse is best served chilled but not ice-cold. Remove from refrigerator 5-10 minutes before serving for optimal texture and flavor release. Extremely cold mousse can taste muted.
Adding Toppings: For best presentation, add toppings just before serving. Whipped cream, fresh berries, and chocolate shavings look best when freshly applied rather than sitting for hours.
Portion Control: Individual portions in ramekins or glasses make serving easy and ensure even chilling throughout. They’re also perfect for entertaining since guests can grab their own portion.
Meal Prep Strategy: Make mousse on Sunday for elegant weeknight desserts throughout the week. Store in individual portions with toppings added fresh before serving.
Make-Ahead & Freezer Notes
Strategic preparation makes this mousse perfect for stress-free entertaining and special occasions.
Make-Ahead Timeline: Vegan chocolate mousse can be made up to 3 days in advance and stored in the refrigerator. In fact, making it 1-2 days ahead is recommended as the flavors develop and improve with time.
Best Timing for Entertaining: For dinner parties or special occasions, make the mousse the day before. This eliminates day-of stress and ensures perfectly set, optimally flavored mousse.
Freezing Recommendations: Chocolate mousse can be frozen for up to 2 months in airtight containers. However, texture changes slightly upon thawing—it may become slightly denser. For best results, thaw overnight in the refrigerator and let sit at room temperature for 10 minutes before serving.
Freezing Individual Portions: Freeze mousse in individual silicone molds or small containers for easy single servings. This makes portion control simple and allows you to thaw only what you need.
Thawing Method: Always thaw frozen mousse in the refrigerator overnight, never at room temperature or in the microwave. Rapid thawing causes separation and texture problems.
What Not to Freeze: Don’t freeze mousse with toppings already added. Whipped cream, fresh berries, and garnishes should always be added fresh after thawing.
Serving Suggestions
This elegant vegan chocolate mousse shines in many contexts, from casual treats to formal entertaining.
Elegant Dinner Party Finale: Serve in beautiful stemmed glasses or crystal dessert cups as the sophisticated ending to a special meal. The impressive presentation belies the simple preparation.
Romantic Dessert for Two: Make just two portions for an intimate Valentine’s Day or anniversary dessert. Serve with strawberries and champagne for the ultimate romantic ending.
Holiday Dessert Spread: Include mousse cups as part of a larger holiday dessert table, offering a lighter, dairy-free option alongside heavier traditional desserts.
Coffee and Dessert Pairing: Serve alongside espresso, cappuccino, or French press coffee for a classic European-style dessert course.
Casual Family Treat: Portion into small cups or ramekins for a special weeknight dessert that makes ordinary evenings feel celebratory.
Topping Suggestions: Fresh raspberries, sliced strawberries, coconut whipped cream, dark chocolate shavings, toasted coconut flakes, cacao nibs, fresh mint, candied orange peel, crushed pistachios, or edible flowers all make beautiful garnishes.
Beverage Pairings: Pair with port wine, dessert wines, coffee, espresso, or raspberry liqueur. For non-alcoholic options, try sparkling water with citrus, herbal tea, or hot chocolate.
FAQs Section
Why did my mousse turn grainy?
Grainy texture usually results from chocolate that seized during melting (water contamination or overheating) or from combining hot chocolate with cold coconut cream. Ensure all equipment is completely dry, melt chocolate gently without overheating, and let chocolate cool before combining with room-temperature coconut cream.
Can I use milk chocolate instead of dark chocolate?
Yes, but the mousse will be sweeter and less intensely chocolatey. Reduce or eliminate the maple syrup if using milk chocolate. Dark chocolate (60-70% cacao) provides the best flavor balance, but use what you enjoy.
How do I know when the mousse is properly set?
Properly set mousse should hold its shape when you tilt the container and have a firm but still creamy texture when you insert a spoon. It shouldn’t be liquid or runny. If still too soft after 4 hours, chill longer.
Can I make this mousse without coconut?
Yes! Substitute the coconut cream with cashew cream (blend soaked raw cashews with water until silky smooth), silken tofu, or mashed ripe avocado. Each alternative creates a slightly different texture and flavor.
Why does my mousse have a coconut flavor?
Some coconut milks have stronger coconut flavor than others. The dark chocolate should mask most coconut taste. If you’re sensitive to coconut flavor, use a different brand or try one of the non-coconut alternatives mentioned above.
Can I use cocoa powder instead of chocolate?
This recipe is designed for bar chocolate, which provides both fat and flavor. Using cocoa powder requires significant recipe modifications and won’t produce the same silky texture. Stick with quality dark chocolate for best results.
How long can I store this mousse?
Refrigerated mousse keeps for up to 5 days in airtight containers. It actually tastes best after 24-48 hours when flavors have fully developed. Add fresh toppings just before serving.
Is this mousse healthy?
While this mousse contains natural ingredients and beneficial antioxidants from dark chocolate, it’s still a dessert meant for enjoyment rather than nutrition. It’s healthier than many traditional desserts due to the absence of refined dairy and eggs, but portion control remains sensible.
Conclusion
This silky vegan chocolate mousse is proof that plant-based desserts can be every bit as luxurious, indulgent, and utterly satisfying as their traditional counterparts. With its cloud-like texture, intense chocolate flavor, and beautiful presentation, this mousse delivers everything you want in a sophisticated dessert while being remarkably simple to prepare. Just a few quality ingredients transform into something truly magical—a dessert that impresses guests, satisfies chocolate cravings, and makes any occasion feel special.
What I love most about this recipe is how it democratizes elegant dessert-making. You don’t need professional pastry training or specialized equipment to create something restaurant-worthy. With a bit of good chocolate, quality coconut milk, and a little patience for chilling, you can produce a dessert that rivals what you’d find at a fine French patisserie. It’s the kind of recipe that builds confidence and makes you feel like a culinary wizard.
I hope you’ll make this vegan chocolate mousse for your next dinner party, romantic evening, holiday gathering, or simply because you deserve something wonderful on an ordinary Tuesday. It’s the perfect dessert for chocolate lovers, vegans, dairy-free eaters, and anyone who appreciates beautiful, delicious food made with care and quality ingredients.
If you create this mousse, I’d love to hear about your experience! Leave a comment below sharing how it turned out, what toppings you chose, or any variations you tried. And if this dreamy chocolate dessert earns a place in your recipe collection, please share it on Pinterest so other chocolate lovers can discover the magic of homemade vegan mousse. Happy cooking, sweet friends!