Vegan No-Bake Cheesecake
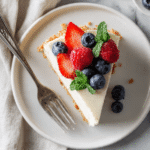
This creamy vegan no-bake cheesecake is the perfect plant-based dessert! Made with cashews, coconut cream, and a delicious date-nut crust, it’s rich, tangy, and incredibly easy to make. No oven required—just blend, chill, and enjoy this dairy-free masterpiece!
- Prep Time: 20 minutes (plus soaking time)
- Chill Time: 4-6 hours
- Cook Time: 0 minutes
- Total Time: 4-6 hours
- Yield: 8-10 servings 1x
- Category: Dessert
- Method: No-Bake
- Cuisine: American
- Diet: Vegan
Ingredients
Scale
For the Crust:
- 1½ cups raw walnuts or pecans
- 1 cup Medjool dates, pitted (about 10–12 dates)
- 2 tablespoons melted coconut oil
- ¼ teaspoon sea salt
- 1 teaspoon vanilla extract
For the Filling:
- 2½ cups raw cashews, soaked for 4–6 hours or overnight
- ¾ cup full-fat coconut cream
- ½ cup maple syrup or agave nectar
- ⅓ cup fresh lemon juice (about 2 large lemons)
- ⅓ cup melted coconut oil
- 2 teaspoons vanilla extract
- ¼ teaspoon sea salt
Optional Toppings:
- Fresh berries (strawberries, blueberries, raspberries)
- Fruit compote or jam
- Vegan chocolate ganache
- Coconut whipped cream
- Fresh mint leaves
Instructions
- Prepare the Pan: Line an 8-inch or 9-inch springform pan with parchment paper on the bottom. You can also lightly grease the sides with coconut oil for easier removal.
- Make the Crust: Add walnuts (or pecans) to your food processor and pulse until they form a coarse meal. Add pitted dates, melted coconut oil, sea salt, and vanilla extract. Process until the mixture sticks together when pressed between your fingers. It should be crumbly but moldable.
- Press the Crust: Transfer the crust mixture to your prepared pan. Use your hands or the bottom of a glass to press it firmly and evenly into the bottom of the pan. Make sure it’s packed tightly and spread to the edges. Place in the freezer while you prepare the filling.
- Drain the Cashews: Drain and rinse your soaked cashews thoroughly under cool water. This removes any enzyme inhibitors and ensures a clean flavor.
- Blend the Filling: Add drained cashews, coconut cream, maple syrup, fresh lemon juice, melted coconut oil, vanilla extract, and sea salt to your high-speed blender. Blend on high for 2-3 minutes, stopping to scrape down the sides as needed, until the mixture is completely smooth and creamy with no graininess. Taste and adjust sweetness or tanginess if desired.
- Pour and Smooth: Remove the crust from the freezer and pour the filling over it. Use a spatula to spread it evenly and smooth the top. Tap the pan gently on the counter a few times to release any air bubbles.
- Chill: Cover the pan with plastic wrap or aluminum foil and place in the freezer for at least 4-6 hours, or until completely set. For best results, freeze overnight. If you prefer a softer texture, you can refrigerate for 6-8 hours instead, but freezing gives cleaner slices.
- Serve: About 10-15 minutes before serving, remove the cheesecake from the freezer to soften slightly. This makes it easier to slice and gives it the perfect creamy texture. Run a knife under hot water and wipe dry between each cut for clean slices.
- Add Toppings: Top with your favorite fresh berries, fruit compote, chocolate drizzle, or a dollop of coconut whipped cream. Serve immediately and enjoy!
- Store: Keep leftover slices covered in the refrigerator for up to 5 days, or in the freezer for up to 1 month. If frozen, let thaw in the refrigerator for 2-3 hours before serving.
Notes
- Soaking cashews is essential for a smooth, creamy texture. Don’t skip this step!
- Make sure your coconut oil is melted but not hot when adding to the blender, as hot oil can cause the mixture to separate.
- For the smoothest texture, use a high-speed blender like a Vitamix. Food processors work but may result in a slightly less smooth filling.
- The cheesecake will be quite soft when first removed from the freezer but will soften to the perfect texture after 10-15 minutes at room temperature.
- If you don’t have a springform pan, line a regular cake pan with parchment paper with overhangs on the sides to lift out the cheesecake.
- Adjust the sweetness to your preference—start with less maple syrup and add more if needed.
Nutrition
- Serving Size: 1 slice (⅛ of cheesecake)
- Calories: 385
- Sugar: 18g
- Sodium: 95mg
- Fat: 28g
- Saturated Fat: 10g
- Unsaturated Fat: 16g
- Trans Fat: 0g
- Carbohydrates: 32g
- Fiber: 3g
- Protein: 7g
- Cholesterol: 0mg
Find it online: https://veganrecepies.com/easy-vegan-no-bake-cheesecake/