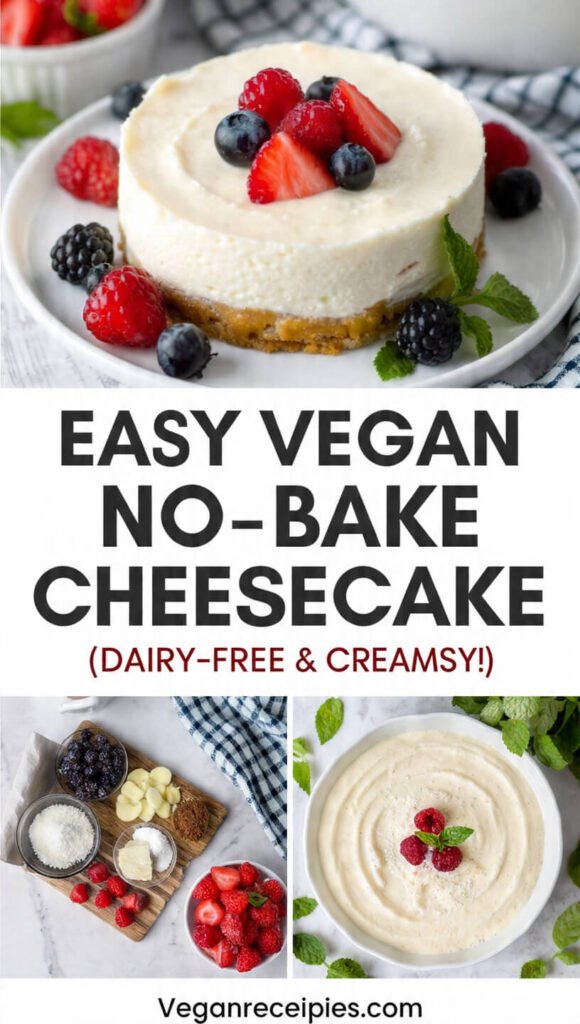
Easy Vegan No-Bake Cheesecake Recipe (Dairy-Free & Creamy!)
Introduction of Recipe
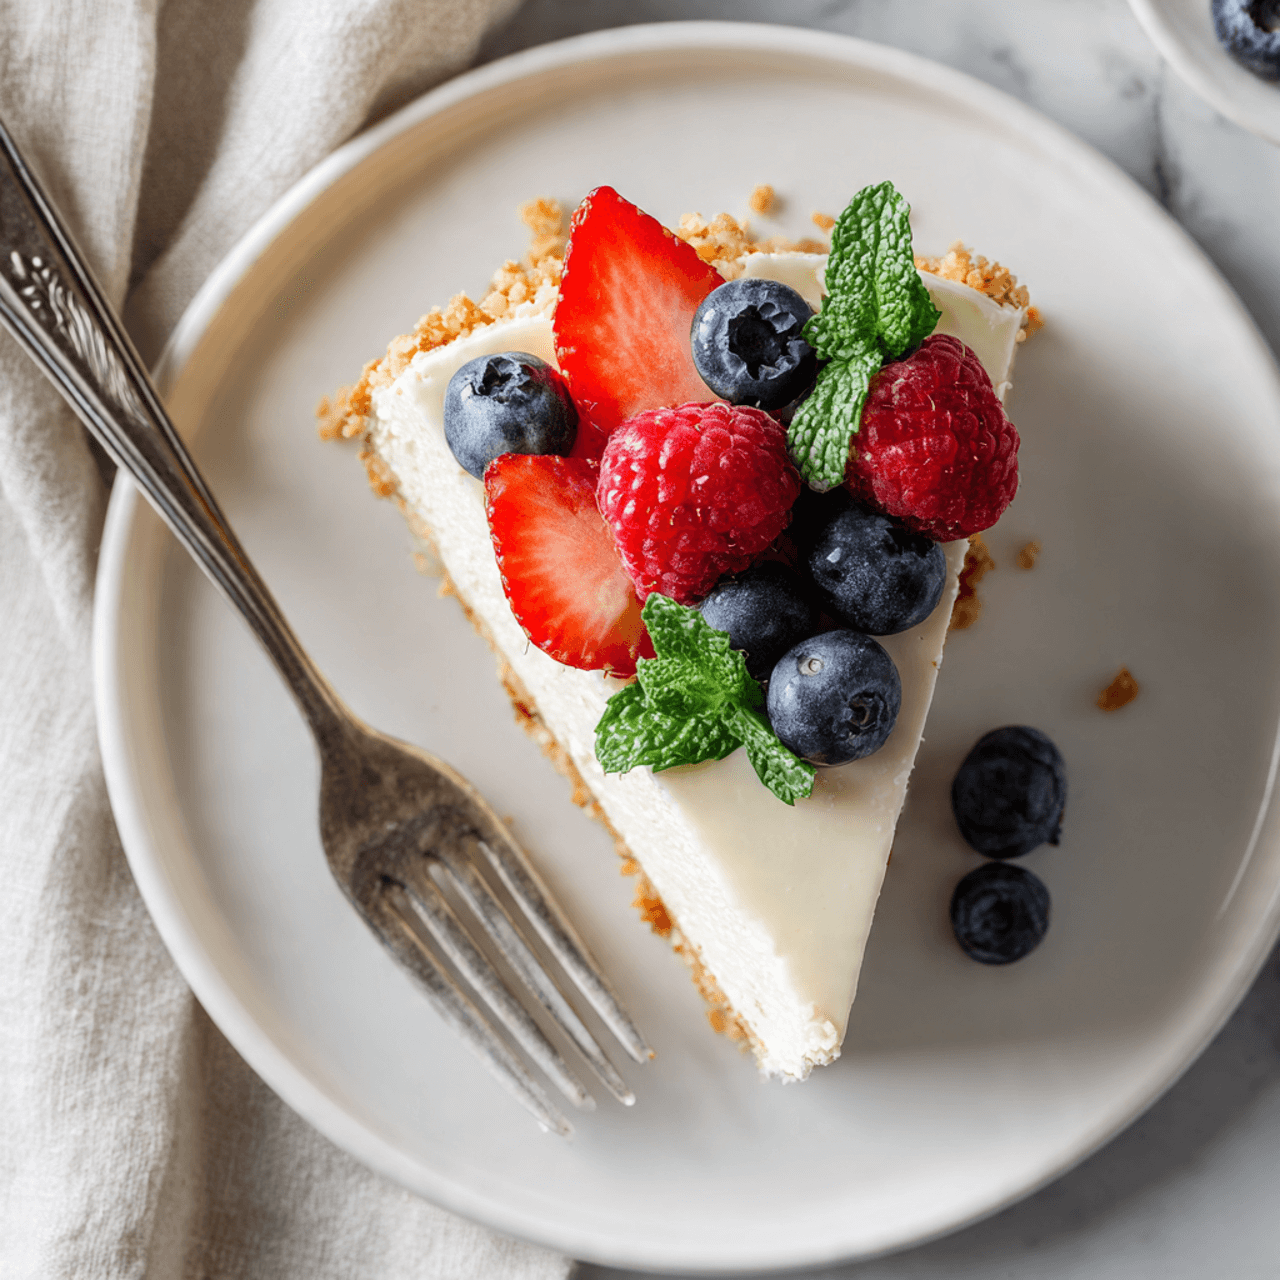
If you’ve been searching for the perfect vegan no-bake cheesecake recipe that’s creamy, indulgent, and incredibly easy to make, you’ve come to the right place! This plant-based dessert is everything a classic cheesecake should be—rich, smooth, and absolutely luxurious—without any dairy, eggs, or baking required. Whether you’re hosting a summer dinner party, celebrating a special occasion, or simply craving something sweet and satisfying, this vegan no-bake cheesecake delivers every single time.
What makes this recipe truly special is its simplicity. There’s no oven preheating, no water baths, and no worrying about cracks on the surface. Just blend, pour, chill, and enjoy! The base is made with crushed nuts and dates for natural sweetness, while the filling combines cashews, coconut cream, and a touch of lemon juice to create that signature tangy cheesecake flavor. It’s perfect for vegans, those with dairy sensitivities, and anyone who wants to enjoy a lighter yet equally decadent dessert.
This vegan no-bake cheesecake is ideal for warm weather gatherings, holiday celebrations, birthdays, or even just a weekend treat. It’s impressive enough to serve at special events but simple enough to whip up on a Tuesday evening. Plus, it’s naturally gluten-free (when using gluten-free cookies for the crust), making it accessible to even more dessert lovers.
History / Background
Cheesecake has an incredibly rich history that dates back thousands of years. The ancient Greeks are credited with creating the first recorded cheesecake recipes around 5,000 years ago. Athletes in the first Olympic games were even served cheesecake for energy! When the Romans conquered Greece, they modified the recipe and spread it throughout Europe, where it evolved into countless regional variations.
The modern American cheesecake we know today—particularly the New York-style version—became popular in the United States in the 1900s, especially after cream cheese was invented. Traditional cheesecakes are dense, rich, and made with cream cheese, eggs, and heavy cream, typically baked in a water bath to achieve that perfect creamy texture.
The vegan no-bake version is a contemporary adaptation that emerged with the rise of plant-based eating in the late 20th and early 21st centuries. As more people adopted vegan lifestyles for health, ethical, or environmental reasons, creative home cooks and professional chefs began reimagining classic desserts using plant-based ingredients. The discovery that soaked cashews could blend into an incredibly creamy base was revolutionary for vegan dessert-making.
No-bake cheesecakes gained popularity in the mid-1900s as a convenient alternative to traditional baked versions, especially in warmer climates where turning on the oven was less desirable. Combining the no-bake technique with vegan ingredients created the perfect solution: a dessert that’s easier to make, naturally dairy-free, and just as delicious as the original. Today, vegan no-bake cheesecake has become a staple in plant-based cooking, beloved by vegans and non-vegans alike for its incredible taste and texture.
Why You’ll Love This Recipe
This vegan no-bake cheesecake is an absolute game-changer for anyone who loves creamy, indulgent desserts without the heaviness of traditional dairy-based versions. It’s a recipe that proves plant-based desserts can be every bit as satisfying and impressive as their conventional counterparts. The texture is silky-smooth, the flavor is perfectly balanced between sweet and tangy, and the best part? It comes together in less than 30 minutes of active time.
Here’s why this recipe will become your new favorite:
- No baking required – Keep your kitchen cool and save energy by skipping the oven entirely
- Naturally gluten-free – Perfect for guests with gluten sensitivities when using appropriate crust ingredients
- Dairy-free and vegan – Compassionate, plant-based, and suitable for those with lactose intolerance
- Make-ahead friendly – Prepare it 1-2 days in advance for stress-free entertaining
- Impressively elegant – Looks and tastes like it came from a fancy bakery
- Customizable – Easy to adapt with different toppings and flavor variations
- Lighter than traditional cheesecake – Rich and satisfying without feeling overly heavy
- Budget-friendly – Uses accessible ingredients that won’t break the bank
- Beginner-friendly – No special techniques or baking experience required
- Crowd-pleasing – Even non-vegans will be amazed by how delicious it tastes
Ingredient Notes
Understanding your ingredients is key to making the perfect vegan no-bake cheesecake. Here’s what you’ll need and why each component matters:
Raw Cashews: These are the star of the filling, creating that signature creamy, cheese-like texture. You’ll need to soak them for at least 4 hours (or overnight) to soften them for blending. If you’re short on time, pour boiling water over them and soak for 1 hour. For those with nut allergies, you can substitute with raw sunflower seeds or macadamia nuts, though the flavor will be slightly different.
Coconut Cream: This adds richness and helps create that luxurious, velvety texture. Use full-fat coconut cream or the thick cream from the top of a chilled can of full-fat coconut milk. Light coconut milk won’t work as well. If you can’t find coconut cream, chill a can of full-fat coconut milk overnight and scoop out the solid cream on top.
Dates: Medjool dates work best for the crust because they’re soft, sweet, and help bind everything together. If your dates are dry, soak them in warm water for 10 minutes and drain before using. You can substitute with maple syrup or agave, but dates provide fiber and natural sweetness without refined sugar.
Nuts for the Crust: Walnuts, pecans, or almonds all work beautifully. They add healthy fats, protein, and a nutty flavor that complements the creamy filling. You can also use gluten-free oat flour or crushed gluten-free cookies if you prefer a nut-free crust.
Lemon Juice: Fresh lemon juice is essential for that authentic tangy cheesecake flavor. It also helps activate the coconut oil for proper setting. Don’t skip this ingredient—it’s what makes it taste like traditional cheesecake!
Coconut Oil: This helps the cheesecake set properly when chilled. Use refined coconut oil if you don’t want a coconut flavor, or unrefined for a subtle tropical note. It must be melted before adding to the mixture.
Maple Syrup or Agave: These natural sweeteners add the perfect amount of sweetness without refined sugar. Maple syrup provides a deeper flavor, while agave is more neutral. Adjust the amount based on your sweetness preference.
Vanilla Extract: Pure vanilla extract enhances all the flavors and adds warmth and depth to the filling. Don’t use imitation vanilla—the real thing makes a noticeable difference.
Sea Salt: Just a pinch balances the sweetness and enhances all the other flavors, making the cheesecake taste more complex and satisfying.
Equipment Needed
You won’t need any fancy equipment for this recipe, but having these tools on hand will make the process smooth and easy:
- High-speed blender or food processor – Essential for creating a silky-smooth filling. A Vitamix, Blendtec, or quality food processor works best.
- 8-inch or 9-inch springform pan – Makes removing the cheesecake effortless. If you don’t have one, a regular cake pan lined with parchment paper works too.
- Measuring cups and spoons – For accurate measurements
- Mixing bowls – For preparing the crust mixture
- Spatula – For spreading the filling evenly and smoothing the top
- Parchment paper – Optional, but helpful for easy removal
- Small saucepan – For melting the coconut oil
- Fine-mesh strainer – Optional, but helpful for draining soaked cashews
[tasty-recipe id=”166″]
Tips & Variations
Flavor Variations:
- Chocolate Vegan Cheesecake: Add ⅓ cup cacao powder to the filling and reduce maple syrup slightly
- Berry Swirl: Reserve ½ cup of filling, blend with ½ cup berries, and swirl into the main filling before chilling
- Pumpkin Spice: Add ½ cup pumpkin puree and 1 tablespoon pumpkin pie spice to the filling for a fall-inspired treat
- Matcha Green Tea: Blend in 2 tablespoons matcha powder for an elegant, earthy flavor
- Peanut Butter: Swirl in ¼ cup natural peanut butter for a protein-packed twist
- Lemon Blueberry: Add extra lemon zest and top with homemade blueberry compote
Crust Variations:
- Use graham crackers (vegan) or Oreos (check ingredients for vegan versions) instead of the nut-date crust
- Add shredded coconut to the crust for tropical flavor
- Use all almonds or all pecans instead of walnuts
- Make it chocolate by adding 2 tablespoons cacao powder to the crust mixture
Topping Ideas:
- Fresh seasonal fruit (mango, passion fruit, kiwi, or mixed berries)
- Salted caramel sauce (vegan)
- Crushed nuts or granola for texture
- Edible flowers for an elegant presentation
- Fruit coulis or compote
- Vegan chocolate chips or chocolate shavings
Dietary Modifications:
- Nut-Free: Substitute cashews with sunflower seeds and use a seed-based crust
- Refined Sugar-Free: Use dates or stevia-based sweeteners instead of maple syrup
- Lower Fat: Use light coconut milk (results will be less creamy)
- Paleo: Ensure all ingredients comply with paleo guidelines
Pro Chef Tips
- Achieve Maximum Creaminess: Soak your cashews in hot water for faster softening, and blend for a full 3-4 minutes. The longer you blend, the creamier your cheesecake will be. Don’t rush this step!
- Temperature Matters: Let your coconut oil cool slightly after melting before adding it to the blender. If it’s too hot, it can cause the other ingredients to warm up and affect the final texture.
- Taste and Adjust: Before pouring the filling into the crust, taste it! This is your chance to adjust the sweetness, tartness, or vanilla. Remember that freezing slightly dulls flavors, so it should taste perfect or even slightly over-seasoned when raw.
- Create the Perfect Crust: Pack your crust tightly and evenly into the pan. Use the bottom of a measuring cup or glass to create a firm, compact base that won’t crumble when you slice the cheesecake.
- Prevent Freezer Burn: Cover your cheesecake tightly with plastic wrap pressed directly onto the surface before covering the pan. This prevents ice crystals from forming and keeps it fresh.
- Clean Slices Every Time: Dip your knife in hot water and wipe it clean between each slice. This professional technique ensures beautiful, clean cuts with no dragging or crumbling.
- Layer for Visual Appeal: For a stunning presentation, create layers by dividing your filling in half and adding different colors or flavors to each portion. Pour one layer, freeze for 30 minutes, then add the second layer.
- Enhance the Tang: If you want more of that authentic cheesecake tang, add an extra tablespoon of lemon juice or a teaspoon of apple cider vinegar to the filling.
Common Mistakes to Avoid
- Not Soaking Cashews Long Enough: Undersoaked cashews will result in a grainy, gritty texture instead of silky smoothness. Always soak for at least 4 hours, or use the hot water method for a minimum of 1 hour. There are no shortcuts here!
- Using the Wrong Coconut Product: Light coconut milk or coconut water won’t work for this recipe. You need full-fat coconut cream or the thick cream from the top of a chilled can of full-fat coconut milk. The fat content is essential for proper texture and setting.
- Skipping the Freezing Step: While you can refrigerate this cheesecake, freezing it first ensures it sets properly and makes slicing much easier. If you only refrigerate, it may be too soft to slice cleanly and could fall apart.
- Over-Processing the Crust: Your crust should still have some texture. If you process the nuts and dates too long, you’ll end up with nut butter instead of a crumbly, press-able crust mixture.
- Not Letting It Soften Before Serving: If you slice the cheesecake straight from the freezer, it will be rock-hard and difficult to eat. Always let it sit at room temperature for 10-15 minutes to reach the perfect creamy, soft texture.
Storage & Meal Prep
Refrigerator Storage: Once set, you can transfer your cheesecake to the refrigerator where it will keep for up to 5 days. Store it covered tightly with plastic wrap or in an airtight container to prevent it from absorbing other flavors. The texture will be slightly softer than when frozen, more like a traditional cheesecake.
Freezer Storage: This cheesecake freezes beautifully for up to 1 month. Keep it in the springform pan covered tightly with plastic wrap and aluminum foil, or slice it and store individual pieces in airtight containers with parchment paper between slices. This makes it easy to grab a single serving whenever the craving hits!
Individual Portions: Consider making this recipe in individual serving sizes using muffin tins or small ramekins. They’re perfect for portion control and make serving a breeze. Freeze them on a baking sheet, then transfer to a freezer bag once solid.
Reheating: No reheating necessary! Simply remove from the freezer 10-15 minutes before serving, or thaw in the refrigerator for 2-3 hours if you prefer a softer, creamier texture similar to traditional cheesecake.
Leftover Tips: If your cheesecake starts to soften too much at room temperature, pop it back in the freezer for 30 minutes to firm up again. It can handle multiple freeze-thaw cycles without affecting quality.
Make-Ahead & Freezer Notes
This vegan no-bake cheesecake is an excellent make-ahead dessert, making it perfect for holiday gatherings, birthday parties, or any time you want to prepare dessert in advance.
Make-Ahead Timeline:
- 2 Days Before: Prepare and freeze the entire cheesecake. This gives it plenty of time to set completely.
- 1 Day Before: If frozen solid, you can transfer it to the refrigerator to soften slightly overnight for a creamier texture.
- Day Of: Add your fresh toppings right before serving for the best presentation and flavor.
Freezing the Whole Cheesecake: Keep it in the springform pan, wrapped tightly in plastic wrap and then aluminum foil. Label with the date and freeze for up to 1 month. This protects it from freezer burn and keeps it tasting fresh.
Freezing Individual Slices: Cut the cheesecake into slices and wrap each piece individually in plastic wrap, then place in a freezer-safe container or bag. This is incredibly convenient for portion control or when you want just one slice without thawing the entire dessert.
Thawing Instructions: For best results, transfer frozen cheesecake to the refrigerator and let thaw for 3-4 hours or overnight. If you need it faster, let it sit at room temperature for 30-45 minutes. Individual slices thaw much faster—about 20-30 minutes at room temperature.
Best Reheating Method: No heating necessary! This is a chilled dessert meant to be served cold. Simply let it soften to your desired texture and enjoy.
Serving Suggestions
This vegan no-bake cheesecake is stunning on its own, but pairing it with complementary sides and beverages elevates the entire dessert experience:
Fresh Fruit: Serve with a colorful array of fresh berries, sliced stone fruits, or tropical fruits like mango and passion fruit. The natural sweetness and acidity balance the richness of the cheesecake perfectly.
Fruit Compotes and Sauces: Warm berry compote, cherry sauce, or passion fruit coulis drizzled over each slice adds beautiful color and complementary flavor. Make these ahead and store in the fridge for easy serving.
Vegan Ice Cream or Whipped Cream: A small scoop of vegan vanilla ice cream or a dollop of coconut whipped cream alongside each slice creates an extra-indulgent presentation.
Coffee or Tea: The rich, creamy cheesecake pairs wonderfully with a hot cup of coffee, espresso, or herbal tea. Try it with mint tea, chamomile, or a bold French roast.
Dessert Wine or Champagne: For special occasions, serve with a glass of dessert wine, sparkling wine, or champagne. The bubbles and subtle sweetness complement the tangy cheesecake beautifully.
Chocolate Drizzle: Melt vegan dark chocolate with a touch of coconut oil and drizzle over each slice for a decadent chocolate-vanilla combination.
Edible Flowers: For an elegant presentation at parties or weddings, garnish with edible flowers like pansies, violets, or rose petals.
Granola or Nuts: Sprinkle crushed granola or toasted nuts on top for added texture and crunch that contrasts beautifully with the smooth, creamy filling.
FAQs Section
Q: Can I make this recipe without a high-speed blender?
A: While a high-speed blender like a Vitamix produces the smoothest results, you can use a regular blender or food processor. You may need to blend longer and scrape down the sides more frequently. The texture might be slightly less smooth, but it will still be delicious. If using a regular blender, blend in smaller batches for better results.
Q: Why is my cheesecake grainy instead of smooth?
A: This usually means your cashews weren’t soaked long enough or your blender isn’t powerful enough to completely break them down. Make sure to soak cashews for at least 4-6 hours in room temperature water, or 1 hour in boiling water. Blend for a full 3-4 minutes, scraping down the sides frequently, until completely silky smooth.
Q: Can I use another nut instead of cashews?
A: Cashews are preferred because they have a mild flavor and create the creamiest texture. Macadamia nuts are the best substitute as they’re similarly creamy and mild. Blanched almonds can work but will result in a slightly less creamy texture and may require additional liquid. Avoid using peanuts or strongly flavored nuts.
Q: How do I know when the cheesecake is set?
A: The cheesecake should be completely firm to the touch when properly frozen. If you gently press the center, it should feel solid, not jiggly. After 4-6 hours in the freezer, it should be ready. If refrigerating instead of freezing, it needs 6-8 hours and will remain slightly softer.
Q: Can I make this cheesecake ahead of time?
A: Absolutely! This is actually one of the best make-ahead desserts. You can prepare it up to 1 week in advance if storing in the freezer, or 2-3 days ahead if keeping refrigerated. Just add fresh toppings right before serving for the best presentation.
Q: My coconut oil separated from the filling—what went wrong?
A: This happens when the coconut oil is too warm when added to the cold soaked cashews, or if the cashews were blended with cold ingredients. Make sure your coconut oil is melted but cooled to room temperature, and blend everything thoroughly until completely incorporated.
Q: Is this cheesecake actually healthy?
A: While it’s made with whole food ingredients like nuts, dates, and coconut, it’s still a dessert and should be enjoyed in moderation. It’s lower in refined sugars than traditional cheesecake and contains healthy fats from nuts and coconut. It’s also free from dairy, cholesterol, and processed ingredients, making it a healthier alternative to conventional cheesecake.
Q: Can I make mini cheesecakes instead of one large one?
A: Yes! Use a muffin tin lined with cupcake liners or small ramekins. Divide the crust and filling among 8-12 portions, freeze for 2-3 hours, and you’ll have perfect individual servings. These are great for parties and portion control.
Conclusion
This vegan no-bake cheesecake is proof that plant-based desserts can be just as indulgent, creamy, and satisfying as traditional versions—maybe even better! With its buttery date-nut crust and silky-smooth cashew filling, it’s a dessert that will impress vegans and non-vegans alike. The best part? It requires no baking, no complicated techniques, and comes together in less than 30 minutes of active time.
Whether you’re making it for a special celebration, holiday gathering, or simply because you deserve something sweet, this recipe delivers every single time. The make-ahead convenience means you can prepare it days in advance without any stress, and the endless topping possibilities let you customize it to your preferences or the season.
I’d love to hear how your vegan no-bake cheesecake turns out! Drop a comment below with your favorite topping combination, snap a photo and tag me on Pinterest, and don’t forget to save this recipe to your dessert board so you can make it again and again. If you loved this recipe, please share it with your friends who would enjoy an incredible dairy-free dessert. Happy baking (or should I say, happy no-baking!)—and enjoy every creamy, delicious bite!